Friday, January 24, 2014

Landscape Maintenance for Central Texas Gardens is 'What's Hot'

Thank you everyone who has purchased a copy of my ebook A Guide to Landscape Maintenance for Central Texas Gardens from the iTunes Bookstore. Your support has put my book in the “What’s Hot” category for the week of January 19, 2014! Thank you!


I also thank KLRU and Linda Lehmusvirta for scheduling me on Central Texas Gardener. My interview with Tom Spencer aired January 18, 2014. Central Texas Gardener is produced in Austin at the KLRU studios. It is one of the best television gardening shows I have seen. CTG targets central Texas with beautiful garden tours, expert interviews, and local professionals presenting seasonal tips. If you have not seen the program, you can find it here. If you would like to see my interview, it can be found on youtube here.  CTG’s producer and coordinator, Linda, also creates CTG’s blog post which can be seen here


Thank you to everyone who is emailing about other formats of the book. Currently I am working on a printed version and a conversion to Kindle format. Contrary to what hardware and software marketers would like you to believe, digital creations and conversions are not quick processes. I appreciate your patience. My goal is to have a printed version out in Austin by March or April. Thank you and stay in touch!

If you have not seen the book yet, you can download a free sample from iTunes


Monday, October 21, 2013

Let the rain linger with rainwater collection or rainwater harvesting


Heavy recent rains remind us that we do have the blessings occasionally (even if the occasions are three years apart!) Let this be a lesson to you to  collect that rain the next time it falls. The winter is a great time to plan and implement a rain saving program. There are several projects that can help you keep water on your property longer: install rain barrels or rain collection tanks; design and create a rain garden; design and install other landscape features to capture rain.

A rain garden is a depressed area in the landscape. Not necessarily a pond, but a low point in the yard where water can settle. Plants are grown in the area that like their feet wet for extended periods. Sedges, rushes, grasses, lilies, standing cypress, some penstemons, and iris are examples of plants that appreciate standing in moist soil. 

Installing some rain barrels around your house will be the easiest way to capture some water to save for a dry day. Rain barrels come in a variety of sizes and styles, even setting out 5-gallon buckets under downspouts will catch some rain for those precious plants you love. However, I suggest starting with at least a 50-gallon barrel of some type. 

Before installing your barrels, you want to be sure you know where the water runs off your roof. Roof valleys are the best location, as are the ends of long runs where the gutter downspout is located. Keep your gutters free of leaf debris so the downspouts are not blocked and leaves or shingle particles don’t fill up the barrel. If you don’t have rain gutters, look for the most worn out spot of soil around the eaves of your house, it shouldn’t be hard to miss.


Once you have selected the best spots to place barrels, level the ground where they will go. Fill the area with pea gravel then stack some landscape bricks, cinder blocks or paving stones on the gravel to support the barrel. This will keep the barrel from sinking into the mud and possibly tipping over. In most areas where I have installed rain barrels, I raised them up so gravity can flow the water for me. Stack the bricks higher on your pad for this.  

Make sure your barrel has a screen on top where the water enters to keep out debris and mosquitos. If, however, you are starting with the five gallon bucket set-up, be sure to put some mosquito dunks in the water. Mosquito dunks contain a bacteria that keep mosquito larvae from maturing, this keeps you and the neighbors happy. 


Many commercial barrels come with or can be outfitted with a hose bib or faucet. This makes utilizing your fresh water easier than dipping it out with a watering can. Hook a hose up to the bib and add a valve on the other end of the hose to close it off when not in use. 

All of the barrels pictured here were available in the Austin area at local nurseries. A new favorite of mine is the green 100-gallon barrel purchased at Plastic Mart in Burnett and western Travis County. http://www.plastic-mart.com


But there are numerous rainbarrel and tank resources in the Central Texas area. I encourage you to look around and have fun designing yourwater collection system, it will be such a benefit to you and your landscape or veggie garden!

If you live on a larger property or have a commercial property, consider installing a rainwater harvesting system. These systems generally collect and store 500 gallons or more and include filters and pumps. For great examples of these visit the Windsor Park Library, the Lady Bird Johnson Wildflower Center, or the LCRA headquarters on Lake Austin Boulevard.


A great reference for rainwater collection is “Rainwater Harvesting” by Brad Lancaster from Tucson, Arizona. His book includes easy to understand diagrams. He also highlights innovative approaches in other cities to collecting and keeping rainwater in planted areas rather than allowing it to run off parking lots and roads. Believe it or not, there are other cities in the country much more advanced than central Texas for water conservation and use. 

The city of Austin is offering rebates to water customers for installing rainwater harvesting systems (500 gallons or more)

Hays County offers rainwater collection incentives

The LCRA provides information on rainwater collecting

Tuesday, October 15, 2013

Rain and Construction of Successful Granite Paths


Ah, the fun of rain in Texas, an all or nothing event. Hence the nickname for our zone “Flash Flood Alley.” What a treat for the Austin area to receive up to 12 inches of rain in some areas on Saturday night (October 12). The first significant rain in three years! (Take note those considering moving here from climates blessed with rain). Why that 12 inches cannot be spread out evenly over a month or two continues to baffle us gardeners. 

That is ok, we are inventive and can adapt our gardening design and style. Building a rain garden into your plan can help store water and moisture in your landscape for days if not weeks depending on the size. Rain barrels for collecting the water are something every home should be required to install. Rain water collection systems can be just that, a collection utilizing barrels of 50 to 75 gallons. Systems can grow up to harvesting plans that  include tanks of 300 gallons plus. 

No matter what your garden style, plans should be made for all the crazy weather central Texas has to offer. This means knowing where the sun beats down in the yard, knowing where the rain runs off your roof, and implementing materials in ways to keep your design stable. 

Decomposed granite, one of the materials of the garden commonly used here in central Texas, needs to be addressed after this heavy rainfall. Crushed or decomposed granite is a product used as mulch, walkways, and driveways. Since it is composed of small bits of crushed granite, it can be washed away easily when two inches of rain are falling per hour. To keep the granite on your property, I recommend designing wide edges and containment lines in long or sloped paths. 


came upon this granite path in west Travis County on October 13. Notice the long run of just decomposed granite. This area probably received more than 12 inches of rain on the night of October 12. Also note there is weed barrier under the granite. 


It is a simple path, quick to lay down the barrier, put down a metal edge and just shovel some granite on top. Quick does not mean durable. This damaged path made me think of a landscape plan I worked on 5 years ago on the grounds of Laguna Gloria. After seeing this disaster, I knew the Laguna path would have held up. I want to share the construction process so you can build a successful path in your garden.


Below is the walkway made of granite and limestone at Laguna Gloria. The left image was taken days after construction of the walkway in 2009. The right image was taken October 14, 2013 two days after 12 inches of rain fell at this location in 6 hours. This path has a grade change of approximately 24 inches over 50 feet in length. It is 4 feet wide and and edged with limestone. Containment lines, or breaks, are perpendicular to the edge every six feet. These edges and containment lines keep the granite from migrating to the surrounding garden beds, turf, or from washing down down grade during heavy rains. This structure can be applied to driveways as well as paths. It can also be utilized with any other type of small surface material such as pea gravel or Tejas black-the grey stone.


The limestone bricks called chopped block, are generally available in two sizes based on width, and are locally quarried. Stones of different colors are available for the same purposes, prices will vary depending on where the stone comes from. Blocks of stone like this are purchased by weight. You can load your own truck or order a large load to be delivered by a dump truck. If you have a large multi-ton load delivered, designate a dumping area on your property that can handle the effects of all those rocks tumbling onto the ground! The crushed granite is purchased by volume, ordered in cubic yards. As with the stone, you can load your own or have bulk loads delivered. Each material is available in small quantities for small jobs or patch-up work. Bags of granite and individually priced blocks of stone can be purchased at most building supply stores and some nurseries. 

Constructing your path

Tools: wheel barrel, flat shovel, hose, square tamper or weighted roller, pick axe if your yard is rocky, hardware cloth, measuring tape. 

Before you start digging out turf or shoveling gravel, get your garden hose out and use it to outline your proposed path. Walk the outlined area a few times from each end to make sure you like the path. Once you have settled on a path, get ready to dig, and dig some more. If you are removing St Augustine turf grass, your chore will be bearable. The flat shovel pushed parallel under the grass surface will cut it off. This type of grass has shallow roots making it easy to remove. Bermuda has deep roots so more time is involved removing this bugger. Repeated applications of horticultural vinegar on the roots will help choke it out. After removing vegetation, remove about one more inch of soil. Sift the soil through hardware cloth to remove roots, runners, and nut sedge nuts. Recycle the soil into beds or compost. Grass roots and nut sedge nuts are difficult to compost, I recommend throwing them in the trash.

With the path free and clear, measure the length and width to calculate materials needed. My experience and suggestion for materials: one inch of builders sand or road base crushed limestone as the base of the path topped with two inches of decomposed granite. Other surface materials could be pea gravel or the grey Tejas Black angular rocks. Granite can be up to 3” deep. You never want more than 2” of pea or Tejas Black because your feet will sink into them making it hard to walk on. To calculate the amount of sand and gravel: Length of path in feet  multiplied by width of path in feet multiplied by depth of material in inches divided by 324 = cubic yards.

L ‘  x  W ‘  x D “  / 324  = cubic yards 

NOTE: I do not recommend  laying weed barrier down in the bottom of the path! You want your path materials to come in contact with the earth to keep them in place. Notice the photo above, the granite just washed right off the smooth weed barrier. Some builders recommend weed barrier to keep weeds from growing through your path. The only weeds that would grow through all this gravel would be Bermuda or nut sedge. These two are easily treated with horticultural vinegar as a weed killer. Any other weeds are going to fall on the paths as seeds and sprout from the surface. 

Edging can be limestone blocks or other stone of your choice, even concrete edging, plastic or metal edging. The brakes, however, should be a stone or concrete block at least four inches wide. A thin metal edge or plastic edge will not hold water streaming down your path pushing granite.

When ready to build the path consider constructing your path in sections, especially if it is long. Finishing sections will give you a sense of accomplishment each day. Trying to complete a whole landscape path all at once can be messy and may make the task feel overwhelming. 


Lay out approximately one inch of sand or road base for the base. The flat shovel is great to use for moving sand and granite, however a regular spade shovel will work fine. Tamp the sand down with a square tamping tool or roller (weighted rollers can be rented at some building supply stores or equipment rental shops). Place your stone edging along the edges of the path and the containment stones perpendicular to the path on the sand as well. Then fill the path with granite edge to edge. Tamp the granite with the tamper, spray it with a little water-a very short shower-then tamp again. It will settle some so spread a little more granite on top. Repeat the process for the next section. Sections should be no more than 6 feet long to keep granite contained. You may choose to make smaller sections which may be better for containing granite. 

Stand back and enjoy the clean line of your new path. Now it will be easier to get into the garden, move tools, and keep your path contained! 

Wednesday, October 9, 2013

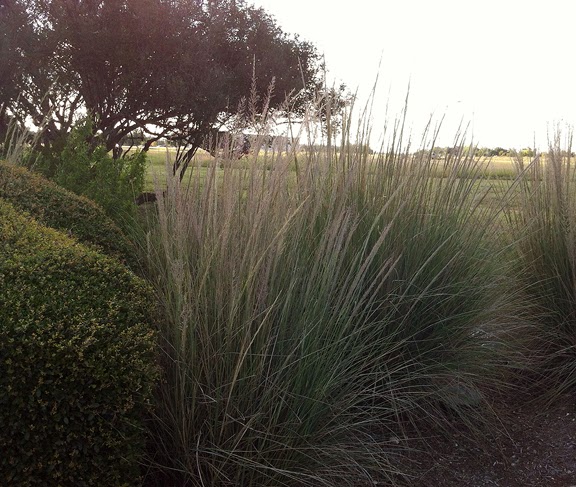
October brings gold with flowering grasses


October is the golden month in Texas, central Texas being the center of the golden glow. By this time of the year there has usually been a shower or two no matter how light to decrease the weight of the sun. Temperatures fall ever so slightly giving the cue to native and naturalized grasses alike that is it time to reproduce. Above are adapted grasses maiden grass on the left, purple fountain grass on the right. Salvia greggii, yellow bells, rough leaf daisy, myriads of asters, and liatris follow suit. The month gives human garden tenders a reprieve from worry and allows time to sit and harmonize with the plants and migrating pollinators. 


Lindheimer muhly is certainly the star of the show this month. Above lindheimer is seen in a commercial planting in Williamson County. This pale blue-green, fine leaved grass provides a great soft texture in the landscape. Its shimmering tawney spikes of flower heads capture sunlight and wave it around like a sparkler. 


Lindheimer muhly should be placed in the back of the garden as a fence or backdrop to the wildflowers and shrubs that flower in front of it the rest of the year. This grass also looks wonderful planted alone in large clumps of 5 or more. Lindheimer muhly grass is an appropriate choice in place of the unfriendly pampas grass common in commercial landscapes. Pampas grass leaves have sharp edges that make for mean paper cuts all over our forearms when we work around them. Lindheimer muhly on the other hand is soft and touchable. It is also easier to clean out, just take a flexible metal leaf rake to the center and rake out dead material at the end of winter. An adjustable fine tined leaf rake is even better. 


The soft purple flower heads of gulf muhly are even sweeter. Like Lindheimer, gulf muhly is soft to the touch and lends soft texture to the garden. Gulf muhly is shorter than the taller lindheimer so you want to place it at the edges of the garden or in clumps with plants not much taller than the grass. Above gulf muhly is near the edge of a bed with a sea of silver ponies foot surrounding it. Gulf muhly’s blades are a deeper green and more mounding than lindheimer’s upright near-fountain shape. Both grasses can tolerate some dampness at their feet but not standing water. Where ever you place them, be sure you can see them in sunlight, backlighting in the fall really shows them off! Grasses are best shown off in mass plantings of three to five or more depending on the size of your landscape. 


Sunday, September 29, 2013

October Maintenance Presentation at the Williamson County Native Plant Society Meeting


With a live showing of my ebook A Guide to Landscape Maintenance for Central Texas Gardens

Thursday October 10 at 7:30 pm I will be presenting “Maintenance for your Garden” at the Georgetown Public Library as a guest of the Williamson County Chapter of the Native Plant Society of Texas. NPSOT meetings are open to the public. My presentation will highlight maintenance tasks for this time of year. 

My goal is to give confidence to new landscape owners, as well as long time gardeners, in accomplishing basic maintenance tasks in the garden. I will discuss tools to make the clean-up and winter preparation easy. Myself and the long-time gardeners will give all assurances that it is ok to whack-back the stringy sages, and to let the ornamental grasses seed for wildlife. And while you are out there, go ahead and dig up those perennials that you have been babying through summer. If you had to water them twice a week, its time to let them go and try something new! And yes, we can plant now and in the winter. 

Here is a primer if you are starting your list (or cannot attend the meeting):

Cut back perennials that have completed blooming for the year. 


Use hand pruners for these: irises, wax myrtle, coneflowers, roses, yellow bells (be ready to cut this one way back after a freeze), pink pavonia, coral yucca stalks, turk’s cap if your flowers have expired-if there are buds hold on to them for traveling hummingbirds. Turk’s cap may need a good whacking back in the winter if your clump is getting un-wieldy or rangey.

Use shears for these: coral sage (be prepared to cut this one to the ground if it freezes in the winter), cenezio, rosemary, germander, inland sea oats, most summer wildflower stalks can be cut to the ground, retain the basal rosette closest to the ground. If you are developing a Wildscape, disperse the seeds from the summer flowers in your landscape.


Any shrubs that you want to shape should be done before a cold spell so new leaves under the sheared area do not freeze. October to November is the best time to shear these: boxwood, cenizo, germander, wax myrtle, yaupons- a note about yaupon shrubs and trees: if you have purposefully planted female yaupons for their berries, use caution when trimming so the berries remain through fall and winter for wildlife. You will have another chance to shear in late winter.

Allow these to complete their bloom cycle: copper canyon daisy, bunch grasses (the seeds provide food for migrating birds), salvia gregii

Plant winter herbs and vegetables such as chives, parsley, broccoli, onions, garlic, and cabbages.

Begin planting wildflower seeds for next spring and summer. You want these in contact with soil before fall rains so they can begin growing during the winter. 

For more information on the Williamson County Native Plant Society meeting, visit their website:


For information on the Native Plant Society of Texas Annual Symposium to be held in Corpus Christi this year, visit the state website:

Friday, February 1, 2013

Introducing a Guide to help with maintenance in your garden

Do you have trouble deciding when to prune your salvia greggii? Not sure how to plant the perennials you want to get started this fall? Wondering why the leaves on your happy green plants turned yellow this summer? 

I have compiled A Guide to Landscape Maintenance for Central Texas Gardens to help you know when and how to do what in your landscape. My Guide is available to you from Apple’s iTunes iBookstore. 


After years of teaching in the GoNativeU program; The Art School at The Austin Museum of Art; operating my own design and maintenance business; and years of volunteering in the Native Plant Society of Texas, I put all the information together in an easy to understand publication. A Guide to Landscape Maintenance for Central Texas Gardens is formatted for the iPad. Over 100 pages packed with descriptions, techniques, references and photos to help you create a beautiful landscape to be admired by all your neighbors. 

The book begins by defining maintenance and why it is important to your landscape and community. Tips are given to help you gain access to your landscape, invite yourself in to observe and cultivate. An entire chapter is dedicated to the basic set of tools to have in your shed, what they do and how to pick good ones. 


Everyone knows central Texas has two basic seasons: hot and not-so-hot! Gardening is a challenge in our area, yet I have broken the year down into groups of months and what garden tasks can be done based on the weather. The bulk of the book is the Season by Season Maintenance tasks and check lists. This chapter is full of photographic examples of challenges in the garden such as sunburn, sooty mold, under-watered plants, caterpillars, weeds and more. 


Probably the most important aspect of a gardening book here in Texas, the next chapter is all about Techniques! Step-by-step instructions on how to do the tasks listed in the Seasonal chapter. Transplanting, planting, watering, spraying, weeding and more. 

Lastly there are resources, further reading and websites for plant choices, wildlife garden, and non-profit groups where you can continue your education.

A Guide to Landscape Maintenance for Central Texas Gardens is an interactive book. Not only is there written descriptions, the book includes slide shows, interactive photos, and galleries of situational examples. There is a free preview available for download with real page examples, not just the book intro! Look at the preview and see for yourself what a great resource this new publication is for central Texas gardeners! 

Sunday, June 6, 2010

The Basics of Garden Design: Scale

The Basics of Garden Design

Part II

Scale


Scale is the relationship of objects to one another. For instance, the height of the ceiling in your house may be 8, 9, or 10 feet. This is a comfortable space for an individual human or a family group. The h

eight of a ceiling in a department store may be 10, 12, or 15 feet. This is because the space accommodates many more humans and things, in this case merchandise. The space feels comfortable and appropriate for the use.


When designing your garden, you should consider scale in several ways. First, how much of the exterior space of your property will be garden compared to house size or lawn space? Second, what plants-due to their hight and width-will fit comfortably in your garden and work with the size of the house? Size of the house in particular being height, and secondarily mass. Third, which of the plants you choose will be massed to create one large form and how big will that form be to balance with the size of your house or property? In the example at right, the yard space between houses is narrow. The space was divided into different elements to create the illusion of a larger space. The ‘room’ area of the back deck is a space its own, and the size of the deck does

not overwhelm the space as a whole. The pot on the terra cotta colored pedestal is just about eye level. This brings in a ‘layer’ under the

taller trees. It too is sized proportionately to the space, not too wide, not too tall. The amount of green groundcover around the pedestal balances the white patio stone and the size of the deck. The small fountain in the foreground complements the size of the entry to the garden. Any larger and it would take all the attention away from the other elements of the garden.


Let’s begin with the first consideration of garden size to house size. If this is a project you plan to implement yourself, meaning you are performing all the labor, then your garden may be predicated on how much work YOU can comfortably accomplish. My advice to everyone: start small, be reasonable. This will help you accomplish a goal in a reasonable period of time. It will also keep you from be overwhelmed if you have a large piece of property. With these thoughts in mind, where do you want to begin? Around the front door, around the mail box, at the end of the driveway, or across the front of the house? Take out your garden hose and outline the space you would like to design. Leave the hose in place for a few days and walk around it to see if this size feels comfortable. Take a digital photo of the area and its surroundings. I will give you instructions on how to use this later in the article.


Next, let’s consider the plants you may want to use. You may have seen plants in other yards in your neighborhood or on your travels around town. Write down all your plant names and begin to research their sizes. If you are in the central Texas area, the Landscape Guide to Plants produced by the City of Austin’s Grow Green program is a first, easy, free, resource for plant growth conditions. Here is where you want to consider height and width of plants in size and their relation to your house or other structures. A common example I use is to think of the size of a

bald cypress which can grow up to 60 feet tall. Now, if it were planted near a small cottage or bungalow style house, or any one story home which is commonly only 12-15 feet tall, that huge tree would feel completely out of place. (Unless you happen to live next to a river where these magnificent trees are growing naturally). If you want a tall tree for shade: monterrey oak, chinquapin, burr, etc., be sure you have the width to your property as well. Additionally, to bring these taller trees into scale with your house, plan for space for shorter trees and shrubs downgrading in size as they lead to the house or outdoor living space. Alternatively, if you are working on a plan for a courtyard, be sure of the mature sizes of trees and shrubs in relation to the amount of space you have.


In the example to the left, a standard southern magnolia is the shade tree and featured element of this front garden. This magnolia is in front of a two story house with a steep pitched roof. The roof reaches up tall next to this tall evergreen tree. The plants in this garden graduate in size from the magnolia giving the eye a full screen of interest from top to bottom. Next in size down from the magnolia is a bay laurel. At maturity it will be several feet taller than shown here, standing solidly next to the magnolia. Down from the bay are spring bouquet viburnums. Viburnums are large shrubs in this setting. And at the foot of all are bi-color iris.

Now back to the digital photo of the area you want to plan. Print out the photo and tape a piece of tracing paper over the photo. Draw in the outline of the garden bed and start to sketch in the new plants you want. Use nearby

plants in the landscape for scale, i.e., height and width as a reference for how big to draw your new plants. For instance, in t

he photo below we have a topiaried boxwood that is three feet tall. Now, if you want to plant a sweet olive next to it, by research you have found that this small tree can grow to 10 feet tall but is a slow grower and is going to stay about six feet tall. So you would draw an outline of the sweet olive about twice as tall as the boxwood. This reference from this point of view will give you a better feel for how your new garden will feel when full.


Here are some more photos representing scale. Notice how the structures are comfortable sizes compared to garden size. Also notice the ‘layering’ where there is plant interest throughout the

vertical plane. In the photo with the tiered fountain, there is a short picket fence in the background. The height of the fountain is approximately 5’. If this were a taller fountain with more tiers or wider, it would overwhelm the space it is in. The large fountain would be cumbersome, hard to work around, and take all the visual appeal up for itself. With this fountain sized just right, your mind is available to view the entire scene, to sit back and relax and see who else is visiting the flora.


Tuesday, March 23, 2010


The Destination in the Garden

Your garden may be large, small, medium, divided, split, on the side, in the back, or in a courtyard. Where ever your garden grows, there is a reason for visiting it. This is the focal point, or destination. It is the attraction that draws your neighbors to meet you, to stop on their walk and admire, to sit a spell.

Pictured here are a couple more examples of focal points in the garden landscape. To the left is a simple stone bench with a piece of stone the garden owner considered important. The gardener set the white stone off, i.e. highlighted the white, with the dramatic dark green spikes of coral yucca and its coral, hummingbird attracting flowers. Imagine you are looking at this garden from the street on your evening walk and you are caught by the stone and yucca. You slow down, if you know your neighbors, you stop to sit at the bench-exactly what it is for. By sitting on the bench you can enjoy the rest of this bountiful garden. You want to enjoy it to learn what these great hearty plants are blooming in the heat of Austin's summer. In the foreground from left to right: lipstick red canna lily, fall aster (to bloom end of summer), a single purple coneflower in the foreground with the flower above the purple heart, purple heart, sago palm, datura (night blooming for moonlit garden strolls).

Also notice in this plan the ample pathway. The path serves as a way to move through the garden as well as a line of sight or "axis." More on axis and line of sight to come. But understand this, the path or line of sight generally leads your eye to the focal point.

Here is another example of a focal point. What is drawing your attention in this garden? Not only from the point of view of the photo, but from the house. The house is on the right, imagine you are looking into the garden from the back porch of the house, what would you be looking at? The blue pot on the pedestal with a pindo palm planted in it. The focal point is something very different from the rest of the garden. This object is clearly important and an object that most of us would want to inspect more closely. What kind of palm is that-you don't see one of those everyday? What is that pot sitting on (a block of limestone)? Is that a ceramic pot or plastic pot? All questions subliminally worked into the wonderful plan to get you into the garden.

Again, with this example, there is a nice wide path to maneuver through the garden. The path also allows a line of sight to the entertaining area as well as space to move food and/or drinks to the dinning area. Another basic idea of garden design is the 'gateway' effect, demonstrated here with the two fan palms flanking the entrance to the dinning area. This gate, or door way delineates one space from another. Thus, the idea of outdoor 'rooms.'

In most garden designs, the focal point, or destination, is where the plan begins. Think about what you want to do in your garden. Do you want a dinning area, a reading bench, or a water feature? Or, have you received a piece of garden art that needs a home. Walk around your yard, feel where you want that destination to be. Stand or sit in the rooms of the house you use most and look out the windows. Are there spots in the yard that you watch the most? Or are there spots on the other side of your yard you want to disguise or draw attention away from? This spot may be the place where you build your gazebo, pond, or plant that beautiful flowering tree. Mark that element on your site plan and then work your garden around that.


Tuesday, March 9, 2010

Beginning your new Garden Design

One of my jobs here in Austin is as a Garden Design Instructor at the Art School at Laguna Gloria and in the GoNativeU Program at the Lady Bird Johnson Wildflower Center. Over the years of teaching these courses, I have worked to simplify the design process for those homeowners that may not have a design background. These folks want to take an active role in creating their own unique landscape that suits their needs and beautifies the community. The basic concepts can help everyone understand what makes a good design plan and can get you on the way to re-working your outdoor environment.

There are three basics design principles to work with when planning a new garden. 1. Focal Point or Destination in the garden. 2. Axis, line of sight, or view corridors. 3. Scale, or relationship of size of objects to one another.

Before beginning the definition of these principles, have your property site plan at hand ready to sketch in the components. I recommend to my students that they start with the site plan they received when they purchased their property. Have this enlarged to a scale of 1/4" equal to 1'. This large size makes drawing and labeling plants and objects easy to read. We call the enlarged plan the base plan. We then will use tracing paper laid over the base to begin the idea process.

On your base plan, you will have to mark in the fixed items that will not be removed from your landscape. These would be items like mature trees, sheds, workshops, concrete patios, walkways, utility boxes, A/C units, or water faucets. The point being, you want to know where all permanent items are in your plan so you will not try to design over them. Next you will need to notate North on your base. This is in order to study and understand where the arc of the sun is on your property. The sunlight hours will greatly influence plant selection. Also notate where shade falls from the house and from large trees. Another important element to notate on your base is where water is common. Do you have rain gutters or not? Where does the rain rush or sit on your property? Or do you have slopes and outcrops to be aware of? Having a good feeing for the environment of your property will help you understand the work process on the land and help select plants that will thrive.

Now that the base is set, here are the basics of design that will give you an understanding of what makes a great landscape design. A focal point is the object of interest in your garden. What is the reason you like to go into your garden? What is the destination in your garden? Examples could be: gazebos, sculpture, fountain, fancy pot, reading bench, entertainment area, or a specimen plant. A specimen is a special plant that normally would on be one of. Normally this would be something really showy, or something very unusual. For instance: a redbud, peach tree, or weeping yaupon. Have you received a nice chair, pot, or tree as a gift lately? Or have you had a special item or spot in mind in the yard that you have wanted to place or beautify? This would be your focal point. Now, where do you want to see that focal point? Do you want it to be found from the front sidewalk? Do you want to see it from inside the house? Where ever you want to see or experience your destination, mark or circle that area on your base site plan.

I will continue additional steps in future posts.

If you are interested in personal instruction, I encourage you to look at these websites to learn more about classes offered in the Austin area.
The Lady Bird Johnson Wildflower Center hosts the GoNativeU program which is coordinated by the UT Informal Classes. Class times and descriptions can be found on the Willdflower Center web site:
http://wildflower.org/gonativeu/

The Art School at Laguna Gloria is part of the Austin Museum of Art. In addition to Garden Design Classes, the Art School offers a variety of traditional and computer based art classes for adults and children. I have a weekend class coming up in April.
http://www.amoa.org/site/PageServer?pagename=art_theartschool

Sunday, January 31, 2010

Now Blooming, Rosemary Even in Winter!


Nature is truly a wonder. Here it is, the middle of winter in central Texas, and there are plants blooming. This month, rosemary is demonstrating it's durability in the cold air. This winter has given our area several blasts of freezing air to remind us winter is still possible. Even though Austin and surrounding areas have sustained temperatures in the 20's and even into the high teens, there are plants that can look good and provide interest year 'round.

Rosmarinus officinalis not only is a dependable plant in the heat here, but sturdy to most of our winters. Its first and foremost use in our landscapes is as a heat tolerant, low water use, evergreen, deer resistant, small shrub. As can be seen in these photos, it provides good green in the winter in addition to the blooms. Rosemary is commonly found in two varieties, upright or Tuscan, and prostrate or creeping. This plant can be left to grow on its own, or shaped. Rosemary does not mind being sheared into somewhat of a hedge, or trimmed for shape and size.

Since our winters consist of see-sawing temperatures, ups and downs, many pollinators live all year in central Texas. These include bees, some butterflies, occasional hummingbirds, an numerous other birds. Since the temperatures are often over 65 degrees, the bees manage to stay active here all the time. With rosemary blooming in winter, this provides a great nectar source for the insects.

Rosemary, of course, provides a delicious benefit for humans. The leaves are one of the basic herbs every kitchen should have in stock. Having a bush or rosemary to pick from for dinner preparations is a nice convenience. Fresh rosemary leaves can be used to flavor soups, stews, salads, salad dressing, and breads.


If you would like to incorporate rosemary into your landscape, it is very easy. Rosemary needs to be in a sunny location, 6 or more hours of sun, and afternoon sun is ok. Its roots prefer good drainage, but decent soil so be sure to add some compost to the location when you plant. Plant one as soon as you can, before it gets hot. Once the weather heats up, it can be hard to keep this (or any plant) watered enough. The leaves will turn pale green when it needing water. In extreme heat, entire branches with turn brown and die off. If this happens, trim the entire branch off, it will not grow new leaves. If you need to trim the plant for size, trim branches at joints. If you want to shape it or shear it, trim in cool seasons. After spring rains and after fall rains are best. If the leaves start to look yellowish, this is usually sign of needing fertilizer, something acidic - acidified liquid seaweed is perfect.


There are two photos here of rosemary in situ. One features prostrate rosemary growing along a street curb. This shows its heat tolerance level! Prostrate rosemary is perfect for planting on retaining walls, terraces, and large pots. It spills over and seems to just love the heat and air circulation. The other photo shows upright rosemary growing in a xeric herb garden in the Lake Travis area. In the foreground is artemesia and near the rosemary the grass looking plant is lemongrass. This is a summer photo as lemongrass is not cold hardy below 30. Rosemary can be used as a "fence" to deter deer from other plants you do not want deer to eat. It is highly aromatic and that is something deer do not like.

Tuesday, December 29, 2009

Its Winter in Central Texas and Loquat Trees are Blooming!


This is the hardy Loquat tree, Eriobotrya japonica, a large member of the rose family. Loquats have been blooming in the Austin area since November. I am telling you, there is always something going on here in the landscape. These hardy adapted trees provide a fragrant splash of evergreen backdrop for medium to large gardens.

The loquat, as can be seen in these photos, has large dark green leaves. They radiate around the flower clusters. A benefit of these flowers is how long the blooms persist. As mentioned above, they have been blooming for nearly a month. There are a few little insects that visit these flowers for their benefit and pollination, including bees. Bees are active in this part of the state year 'round. Generally the days warm up above their required 60 degrees so they can be out and about enjoying local gardens. And yes, the insects will help these flowers produce loquat fruits! They are quite sweet and tasty. Don't be confused, however, between these and kumquat. Kumquat is a citrus and can be very tangy.

Loquat trees are medium to fast growing depending on the conditions. The more water the faster the growth. They do not like standing water. Full sun can sometimes burn over exposed leaves (this would be a day of 8+ hours of sun). But a mostly sunny spot to part shade is fine for them. They could make a large specimen tree if shaped nicely on their own, or can be part of a grouping of trees with taller ones behind. Loquats in central Texas grow to about 15 or 20 feet tall and almost as wide. They require very little care once established and small ones under 4 feet transplant quite easily. Loquats rarely exhibit signs of chlorosis or any soil deficiency. They are planted from east Austin to West Lake Hills. So one can infer they are highly adaptable to soil conditions. However, adding some compost in the hole when planting a loquat or any tree is advised. Be sure to mulch in the spring to keep the soil cooler and moist longer in the summer.

The loquat's soil adaptability makes it a good alternative to Southern Magnolia, as far as the large dark green leaf look is concerned. Though they do not have the huge showy flower, they are fragrant none-the-less. Magnolias really struggle in the thin, alkaline soil, especially west of central Austin. If you like this look, the low maintenance aspect, a winter bloomer, then plant one now! Or at least by February if you find one. The sooner you get it in the ground, the sooner its roots can adapt to its home before the top gets hit by the summer heat. It is best to plant all trees and larger shrubs here in the winter.

Tuesday, November 24, 2009


Now Blooming

One of the biggest show stoppers of the fall is Copper Canyon Daisy, Tagetes lemmonii. A little orangier than lemon, but radiant like the fruit none-the-less. Copper canyon daisy takes its common name from its home range in Mexico, around the Copper Canyon. This profusion of daisies is an herbaceous perennial. This means most of its above ground parts are non-woody and therefore usually freeze in Austin area winters. Being a trustworthy perennial from a dry mountainous area, it dutifully returns from the roots year after year. This plant also layers well. Layering is the term for reproduction by roots sprouted from branches. The long thin weak stems will stretch out then fall to the ground. Were the branch touches the soil it will root, thus creating a whole new plant.

Copper canyon daisy has been a new mainstay of the drought resistant garden in Texas. This plant should be found in nearly every nursery center west of Columbus, Texas. It certainly has had no problem adapting to the central Texas climate or soil. This perennial likes to live in well drained soil and can survive on very little water. The best time to plant this perennial is early spring if you can find it. Plant up until April so it can get a good start in the ground to grow through summer. It will bloom best with nearly full day sun. With anything less than 6 hours of sun, it will be thin leaved, and sparsely flowered. Copper canyon daisy grows rapidly after the last frost and then flowers are borne on the ends of the branches in early fall until the first freeze. The bush can be trimmed as needed up until about August. It is not wise to trim later due to the flowers being on the outer edge of the plant. Cut the plant back to the ground after it freezes in winter.

Copper canyon daisy is an important color perennial for deer resistant gardens. What deters the deer from eating this plant is its extreme pungent aroma. Most people either like the smell or can’t stand it. It is not subtle at all! While deer have lowered their standards of browsing choice due to the drought and over population, there are no reports of them eating copper canyon daisy as yet. Remember the deer avoidance rule of thumb: either stinky or stickery, they stay away from. Use copper canyon daisy as a shield to protect plants that may be marginally attractive to deer. The harsh aroma of the foliage will overpower any other plants around and hopefully the deer will not find your special items.

Pictured here, copper canyon daisy is with Mexican Bush Sage, Salvia leucantha. A partner in hardiness, this sage is also an herbaceous perennial. It can be a little more sensitive to cold, if the temperatures are too cold, the roots can be damaged. Mexican Bush sage also grows completely after the last frost to produce flowers in the summer. Sometimes it starts blooming mid summer, sometimes later. It is usually blooming before the copper canyon daisy. Cut this one back to the ground too in winter after it freezes.

Both Mexican bush sage and copper canyon daisy have quite long lasting blooms. This makes them dependable fall bloomers in the landscape. It also means they are good long lived nectar sources for insects. The foliage of copper canyon daisy can be used as a seasoning in cooking or in teas. Mix the foliage with that of Mexican Mint Marigold, Tagetes lucida, and your other favorite herbs for regionally flavored meat or dip seasoning.

©2009 Ginger Hudson

Wednesday, November 18, 2009


Tribute to Fall Color

Who says there is no fall in Central Texas? I hope everyone, plant lovers, art lovers, season lovers, are seeing what this wonderful early cool spell has cast on our hillsides. The Hill Country is being blessed with a brilliant splash of color typically relegated to the northeast. Yellow, orange, and bright red leaves are glowing in the grey overcast days, and radiating on the blue sunny days. While meteorologists still speculate on what makes the perfect fall for leaf lookers, it seems the early and sustained cool spell has certainly made an impact in the local plant pallet.

All the usual suspects have made a miraculous appearance on short notice with rain only just hitting them in September after a year of rain missing in action. These native perennials and annuals made a grand appearance: Rough leaf sunflower (or daisy as some may know it), liatris, maxamillian sunflower, goldenrod, and native grasses. Adapted plants that have provided a good show include: roses, butterfly weed, plumbago, and pride of Barbados. And how about these spring bloomers that have a sudden sense of urgency to reproduce: pomegranate, Bradford pear, and even an errant Carolina Jessamine. Crazy Love! Just a fabulous example of how nature will find a way to survive.

As for the trees that are radiant on the hillsides, their show is practically a jaw dropper. The deciduous ones, those that lose their leaves in winter, are the trees giving us the wonderful color. On wild or native hillsides look for: redbud, cedar elm, shumard oak (close relations: Spanish oak, Texas red oak) rough leaf dogwood, Mexican plum, Texas buckeye, a little bit of sycamore and cottonwood. Along the water ways look for bald and Montezuma cypress, Mexican buckeye, and sycamore.

If you are looking for a specimen tree to make a show in your landscape, investigate these small trees: Texas redbud-not only is it the star of the show in early spring with intense pink blossoms, it also provides a bright yellow nearly heart shaped leaf in the fall. Mexican plum is another spring show stopper-covered in somewhat fragrant white flowers on bare branches it provides loads of nectar for bees, then in the fall the leaves gradate in colors from yellow to peach to reddish. And, for the bonus, a few thumb size pinkish plums. Texas buckeye is a small tree with spring and fall interest. In spring, it shows clusters of tubular flowers yellow or red or crossbreeds in between at the same time as the leaves appear. In the fall it shows great yellow color leaves. Here is one for nearly year round enjoyment, Mexican buckeye. This small vase shaped tree sprouts pink flowers on bare branches at about the same time as the redbud, although redbud holds its flowers longer. The Mexican buckeye displays yellow to copper leaves in the fall, then after the leaves drop, the tree is left with large triangular and bulbous seed cluster. The seeds inside looks like a buck’s eye, hence the name.

For a large specimen tree, the favorite is the Texas red oak. Species include Shumard and Spanish red oak. These trees do not provide showy flowers, but make up for it in the fall with deep rich wine red to orange red leaves. The red oak can grow up to forty feet tall. A large tree for wet areas, near a creek, river or body of water is native cypress: Montezuma or Bald. These trees grow in a stately conical shape-christmas tree like-with very straight horizontal branches. In the fall, the small needle like leaves are some of the first to turn orange, gold, and coppery. Stunning! The cypresses can be upwards of sixty feet tall at maturity. Rusty blackhaw viburnum (pictured here) is sometimes considered a smaller tree but can get large given the ideal circumstances. This tree is even more brilliant that the red oak in its redness due to the glossy nature of the leaves.

Standard shade and common trees found already growing on many city lots are cedar elm, red oaks, burr oaks, and redbud. These are yellow to copper to brown. Easy to grow, good shade, and accent additions to the fall landscape.

Tree Folks produces a Tree Growing Guide for Austin and the Hill Country that illustrates trees appropriate to this area and their relative size to one another. This guide is available at most local nurseries for around three dollars, and from them directly, www.treefolks.org. The booklet produced by the city of Austin Grow Green program, Native and Adapted Landscape Plants, includes color photos of plants and growing information on each species. This publication is free at most garden retailers in Austin. Or, look at their web site: www.growgreen.org

For up close and personal tree viewing, visit the Lady Bird Johnson Wildflower Center where plants are labeled individually. Also, Zilker Botanical Gardens is a great display garden to see plants in groups of who likes to cohabitate with whom.

Winter is the time to plant trees in the Austin area. Getting them in the ground while the weather is cool enables the trees to get their roots established before the brutal onslaught of summer heat. Trees put their energy into developing a strong foundation while the upper parts are dormant in winter. Admire the trees, pick one out and get home and plant it!