Tuesday, October 15, 2013

Rain and Construction of Successful Granite Paths


Ah, the fun of rain in Texas, an all or nothing event. Hence the nickname for our zone “Flash Flood Alley.” What a treat for the Austin area to receive up to 12 inches of rain in some areas on Saturday night (October 12). The first significant rain in three years! (Take note those considering moving here from climates blessed with rain). Why that 12 inches cannot be spread out evenly over a month or two continues to baffle us gardeners. 

That is ok, we are inventive and can adapt our gardening design and style. Building a rain garden into your plan can help store water and moisture in your landscape for days if not weeks depending on the size. Rain barrels for collecting the water are something every home should be required to install. Rain water collection systems can be just that, a collection utilizing barrels of 50 to 75 gallons. Systems can grow up to harvesting plans that  include tanks of 300 gallons plus. 

No matter what your garden style, plans should be made for all the crazy weather central Texas has to offer. This means knowing where the sun beats down in the yard, knowing where the rain runs off your roof, and implementing materials in ways to keep your design stable. 

Decomposed granite, one of the materials of the garden commonly used here in central Texas, needs to be addressed after this heavy rainfall. Crushed or decomposed granite is a product used as mulch, walkways, and driveways. Since it is composed of small bits of crushed granite, it can be washed away easily when two inches of rain are falling per hour. To keep the granite on your property, I recommend designing wide edges and containment lines in long or sloped paths. 


came upon this granite path in west Travis County on October 13. Notice the long run of just decomposed granite. This area probably received more than 12 inches of rain on the night of October 12. Also note there is weed barrier under the granite. 


It is a simple path, quick to lay down the barrier, put down a metal edge and just shovel some granite on top. Quick does not mean durable. This damaged path made me think of a landscape plan I worked on 5 years ago on the grounds of Laguna Gloria. After seeing this disaster, I knew the Laguna path would have held up. I want to share the construction process so you can build a successful path in your garden.


Below is the walkway made of granite and limestone at Laguna Gloria. The left image was taken days after construction of the walkway in 2009. The right image was taken October 14, 2013 two days after 12 inches of rain fell at this location in 6 hours. This path has a grade change of approximately 24 inches over 50 feet in length. It is 4 feet wide and and edged with limestone. Containment lines, or breaks, are perpendicular to the edge every six feet. These edges and containment lines keep the granite from migrating to the surrounding garden beds, turf, or from washing down down grade during heavy rains. This structure can be applied to driveways as well as paths. It can also be utilized with any other type of small surface material such as pea gravel or Tejas black-the grey stone.


The limestone bricks called chopped block, are generally available in two sizes based on width, and are locally quarried. Stones of different colors are available for the same purposes, prices will vary depending on where the stone comes from. Blocks of stone like this are purchased by weight. You can load your own truck or order a large load to be delivered by a dump truck. If you have a large multi-ton load delivered, designate a dumping area on your property that can handle the effects of all those rocks tumbling onto the ground! The crushed granite is purchased by volume, ordered in cubic yards. As with the stone, you can load your own or have bulk loads delivered. Each material is available in small quantities for small jobs or patch-up work. Bags of granite and individually priced blocks of stone can be purchased at most building supply stores and some nurseries. 

Constructing your path

Tools: wheel barrel, flat shovel, hose, square tamper or weighted roller, pick axe if your yard is rocky, hardware cloth, measuring tape. 

Before you start digging out turf or shoveling gravel, get your garden hose out and use it to outline your proposed path. Walk the outlined area a few times from each end to make sure you like the path. Once you have settled on a path, get ready to dig, and dig some more. If you are removing St Augustine turf grass, your chore will be bearable. The flat shovel pushed parallel under the grass surface will cut it off. This type of grass has shallow roots making it easy to remove. Bermuda has deep roots so more time is involved removing this bugger. Repeated applications of horticultural vinegar on the roots will help choke it out. After removing vegetation, remove about one more inch of soil. Sift the soil through hardware cloth to remove roots, runners, and nut sedge nuts. Recycle the soil into beds or compost. Grass roots and nut sedge nuts are difficult to compost, I recommend throwing them in the trash.

With the path free and clear, measure the length and width to calculate materials needed. My experience and suggestion for materials: one inch of builders sand or road base crushed limestone as the base of the path topped with two inches of decomposed granite. Other surface materials could be pea gravel or the grey Tejas Black angular rocks. Granite can be up to 3” deep. You never want more than 2” of pea or Tejas Black because your feet will sink into them making it hard to walk on. To calculate the amount of sand and gravel: Length of path in feet  multiplied by width of path in feet multiplied by depth of material in inches divided by 324 = cubic yards.

L ‘  x  W ‘  x D “  / 324  = cubic yards 

NOTE: I do not recommend  laying weed barrier down in the bottom of the path! You want your path materials to come in contact with the earth to keep them in place. Notice the photo above, the granite just washed right off the smooth weed barrier. Some builders recommend weed barrier to keep weeds from growing through your path. The only weeds that would grow through all this gravel would be Bermuda or nut sedge. These two are easily treated with horticultural vinegar as a weed killer. Any other weeds are going to fall on the paths as seeds and sprout from the surface. 

Edging can be limestone blocks or other stone of your choice, even concrete edging, plastic or metal edging. The brakes, however, should be a stone or concrete block at least four inches wide. A thin metal edge or plastic edge will not hold water streaming down your path pushing granite.

When ready to build the path consider constructing your path in sections, especially if it is long. Finishing sections will give you a sense of accomplishment each day. Trying to complete a whole landscape path all at once can be messy and may make the task feel overwhelming. 


Lay out approximately one inch of sand or road base for the base. The flat shovel is great to use for moving sand and granite, however a regular spade shovel will work fine. Tamp the sand down with a square tamping tool or roller (weighted rollers can be rented at some building supply stores or equipment rental shops). Place your stone edging along the edges of the path and the containment stones perpendicular to the path on the sand as well. Then fill the path with granite edge to edge. Tamp the granite with the tamper, spray it with a little water-a very short shower-then tamp again. It will settle some so spread a little more granite on top. Repeat the process for the next section. Sections should be no more than 6 feet long to keep granite contained. You may choose to make smaller sections which may be better for containing granite. 

Stand back and enjoy the clean line of your new path. Now it will be easier to get into the garden, move tools, and keep your path contained! 

Wednesday, October 9, 2013

October brings gold with flowering grasses


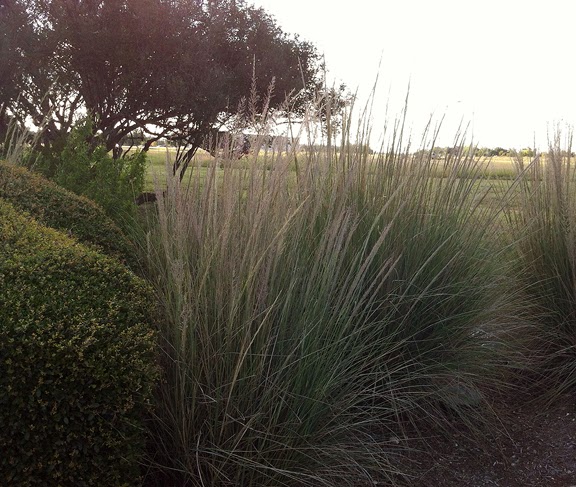
October is the golden month in Texas, central Texas being the center of the golden glow. By this time of the year there has usually been a shower or two no matter how light to decrease the weight of the sun. Temperatures fall ever so slightly giving the cue to native and naturalized grasses alike that is it time to reproduce. Above are adapted grasses maiden grass on the left, purple fountain grass on the right. Salvia greggii, yellow bells, rough leaf daisy, myriads of asters, and liatris follow suit. The month gives human garden tenders a reprieve from worry and allows time to sit and harmonize with the plants and migrating pollinators. 


Lindheimer muhly is certainly the star of the show this month. Above lindheimer is seen in a commercial planting in Williamson County. This pale blue-green, fine leaved grass provides a great soft texture in the landscape. Its shimmering tawney spikes of flower heads capture sunlight and wave it around like a sparkler. 


Lindheimer muhly should be placed in the back of the garden as a fence or backdrop to the wildflowers and shrubs that flower in front of it the rest of the year. This grass also looks wonderful planted alone in large clumps of 5 or more. Lindheimer muhly grass is an appropriate choice in place of the unfriendly pampas grass common in commercial landscapes. Pampas grass leaves have sharp edges that make for mean paper cuts all over our forearms when we work around them. Lindheimer muhly on the other hand is soft and touchable. It is also easier to clean out, just take a flexible metal leaf rake to the center and rake out dead material at the end of winter. An adjustable fine tined leaf rake is even better. 


The soft purple flower heads of gulf muhly are even sweeter. Like Lindheimer, gulf muhly is soft to the touch and lends soft texture to the garden. Gulf muhly is shorter than the taller lindheimer so you want to place it at the edges of the garden or in clumps with plants not much taller than the grass. Above gulf muhly is near the edge of a bed with a sea of silver ponies foot surrounding it. Gulf muhly’s blades are a deeper green and more mounding than lindheimer’s upright near-fountain shape. Both grasses can tolerate some dampness at their feet but not standing water. Where ever you place them, be sure you can see them in sunlight, backlighting in the fall really shows them off! Grasses are best shown off in mass plantings of three to five or more depending on the size of your landscape. 


Sunday, September 29, 2013

October Maintenance Presentation at the Williamson County Native Plant Society Meeting


With a live showing of my ebook A Guide to Landscape Maintenance for Central Texas Gardens

Thursday October 10 at 7:30 pm I will be presenting “Maintenance for your Garden” at the Georgetown Public Library as a guest of the Williamson County Chapter of the Native Plant Society of Texas. NPSOT meetings are open to the public. My presentation will highlight maintenance tasks for this time of year. 

My goal is to give confidence to new landscape owners, as well as long time gardeners, in accomplishing basic maintenance tasks in the garden. I will discuss tools to make the clean-up and winter preparation easy. Myself and the long-time gardeners will give all assurances that it is ok to whack-back the stringy sages, and to let the ornamental grasses seed for wildlife. And while you are out there, go ahead and dig up those perennials that you have been babying through summer. If you had to water them twice a week, its time to let them go and try something new! And yes, we can plant now and in the winter. 

Here is a primer if you are starting your list (or cannot attend the meeting):

Cut back perennials that have completed blooming for the year. 


Use hand pruners for these: irises, wax myrtle, coneflowers, roses, yellow bells (be ready to cut this one way back after a freeze), pink pavonia, coral yucca stalks, turk’s cap if your flowers have expired-if there are buds hold on to them for traveling hummingbirds. Turk’s cap may need a good whacking back in the winter if your clump is getting un-wieldy or rangey.

Use shears for these: coral sage (be prepared to cut this one to the ground if it freezes in the winter), cenezio, rosemary, germander, inland sea oats, most summer wildflower stalks can be cut to the ground, retain the basal rosette closest to the ground. If you are developing a Wildscape, disperse the seeds from the summer flowers in your landscape.


Any shrubs that you want to shape should be done before a cold spell so new leaves under the sheared area do not freeze. October to November is the best time to shear these: boxwood, cenizo, germander, wax myrtle, yaupons- a note about yaupon shrubs and trees: if you have purposefully planted female yaupons for their berries, use caution when trimming so the berries remain through fall and winter for wildlife. You will have another chance to shear in late winter.

Allow these to complete their bloom cycle: copper canyon daisy, bunch grasses (the seeds provide food for migrating birds), salvia gregii

Plant winter herbs and vegetables such as chives, parsley, broccoli, onions, garlic, and cabbages.

Begin planting wildflower seeds for next spring and summer. You want these in contact with soil before fall rains so they can begin growing during the winter. 

For more information on the Williamson County Native Plant Society meeting, visit their website:


For information on the Native Plant Society of Texas Annual Symposium to be held in Corpus Christi this year, visit the state website:

Friday, February 1, 2013

Introducing a Guide to help with maintenance in your garden

Do you have trouble deciding when to prune your salvia greggii? Not sure how to plant the perennials you want to get started this fall? Wondering why the leaves on your happy green plants turned yellow this summer? 

I have compiled A Guide to Landscape Maintenance for Central Texas Gardens to help you know when and how to do what in your landscape. My Guide is available to you from Apple’s iTunes iBookstore. 


After years of teaching in the GoNativeU program; The Art School at The Austin Museum of Art; operating my own design and maintenance business; and years of volunteering in the Native Plant Society of Texas, I put all the information together in an easy to understand publication. A Guide to Landscape Maintenance for Central Texas Gardens is formatted for the iPad. Over 100 pages packed with descriptions, techniques, references and photos to help you create a beautiful landscape to be admired by all your neighbors. 

The book begins by defining maintenance and why it is important to your landscape and community. Tips are given to help you gain access to your landscape, invite yourself in to observe and cultivate. An entire chapter is dedicated to the basic set of tools to have in your shed, what they do and how to pick good ones. 


Everyone knows central Texas has two basic seasons: hot and not-so-hot! Gardening is a challenge in our area, yet I have broken the year down into groups of months and what garden tasks can be done based on the weather. The bulk of the book is the Season by Season Maintenance tasks and check lists. This chapter is full of photographic examples of challenges in the garden such as sunburn, sooty mold, under-watered plants, caterpillars, weeds and more. 


Probably the most important aspect of a gardening book here in Texas, the next chapter is all about Techniques! Step-by-step instructions on how to do the tasks listed in the Seasonal chapter. Transplanting, planting, watering, spraying, weeding and more. 

Lastly there are resources, further reading and websites for plant choices, wildlife garden, and non-profit groups where you can continue your education.

A Guide to Landscape Maintenance for Central Texas Gardens is an interactive book. Not only is there written descriptions, the book includes slide shows, interactive photos, and galleries of situational examples. There is a free preview available for download with real page examples, not just the book intro! Look at the preview and see for yourself what a great resource this new publication is for central Texas gardeners! 

Sunday, June 6, 2010

The Basics of Garden Design: Scale

The Basics of Garden Design

Part II

Scale


Scale is the relationship of objects to one another. For instance, the height of the ceiling in your house may be 8, 9, or 10 feet. This is a comfortable space for an individual human or a family group. The h

eight of a ceiling in a department store may be 10, 12, or 15 feet. This is because the space accommodates many more humans and things, in this case merchandise. The space feels comfortable and appropriate for the use.


When designing your garden, you should consider scale in several ways. First, how much of the exterior space of your property will be garden compared to house size or lawn space? Second, what plants-due to their hight and width-will fit comfortably in your garden and work with the size of the house? Size of the house in particular being height, and secondarily mass. Third, which of the plants you choose will be massed to create one large form and how big will that form be to balance with the size of your house or property? In the example at right, the yard space between houses is narrow. The space was divided into different elements to create the illusion of a larger space. The ‘room’ area of the back deck is a space its own, and the size of the deck does

not overwhelm the space as a whole. The pot on the terra cotta colored pedestal is just about eye level. This brings in a ‘layer’ under the

taller trees. It too is sized proportionately to the space, not too wide, not too tall. The amount of green groundcover around the pedestal balances the white patio stone and the size of the deck. The small fountain in the foreground complements the size of the entry to the garden. Any larger and it would take all the attention away from the other elements of the garden.


Let’s begin with the first consideration of garden size to house size. If this is a project you plan to implement yourself, meaning you are performing all the labor, then your garden may be predicated on how much work YOU can comfortably accomplish. My advice to everyone: start small, be reasonable. This will help you accomplish a goal in a reasonable period of time. It will also keep you from be overwhelmed if you have a large piece of property. With these thoughts in mind, where do you want to begin? Around the front door, around the mail box, at the end of the driveway, or across the front of the house? Take out your garden hose and outline the space you would like to design. Leave the hose in place for a few days and walk around it to see if this size feels comfortable. Take a digital photo of the area and its surroundings. I will give you instructions on how to use this later in the article.


Next, let’s consider the plants you may want to use. You may have seen plants in other yards in your neighborhood or on your travels around town. Write down all your plant names and begin to research their sizes. If you are in the central Texas area, the Landscape Guide to Plants produced by the City of Austin’s Grow Green program is a first, easy, free, resource for plant growth conditions. Here is where you want to consider height and width of plants in size and their relation to your house or other structures. A common example I use is to think of the size of a

bald cypress which can grow up to 60 feet tall. Now, if it were planted near a small cottage or bungalow style house, or any one story home which is commonly only 12-15 feet tall, that huge tree would feel completely out of place. (Unless you happen to live next to a river where these magnificent trees are growing naturally). If you want a tall tree for shade: monterrey oak, chinquapin, burr, etc., be sure you have the width to your property as well. Additionally, to bring these taller trees into scale with your house, plan for space for shorter trees and shrubs downgrading in size as they lead to the house or outdoor living space. Alternatively, if you are working on a plan for a courtyard, be sure of the mature sizes of trees and shrubs in relation to the amount of space you have.


In the example to the left, a standard southern magnolia is the shade tree and featured element of this front garden. This magnolia is in front of a two story house with a steep pitched roof. The roof reaches up tall next to this tall evergreen tree. The plants in this garden graduate in size from the magnolia giving the eye a full screen of interest from top to bottom. Next in size down from the magnolia is a bay laurel. At maturity it will be several feet taller than shown here, standing solidly next to the magnolia. Down from the bay are spring bouquet viburnums. Viburnums are large shrubs in this setting. And at the foot of all are bi-color iris.

Now back to the digital photo of the area you want to plan. Print out the photo and tape a piece of tracing paper over the photo. Draw in the outline of the garden bed and start to sketch in the new plants you want. Use nearby

plants in the landscape for scale, i.e., height and width as a reference for how big to draw your new plants. For instance, in t

he photo below we have a topiaried boxwood that is three feet tall. Now, if you want to plant a sweet olive next to it, by research you have found that this small tree can grow to 10 feet tall but is a slow grower and is going to stay about six feet tall. So you would draw an outline of the sweet olive about twice as tall as the boxwood. This reference from this point of view will give you a better feel for how your new garden will feel when full.


Here are some more photos representing scale. Notice how the structures are comfortable sizes compared to garden size. Also notice the ‘layering’ where there is plant interest throughout the

vertical plane. In the photo with the tiered fountain, there is a short picket fence in the background. The height of the fountain is approximately 5’. If this were a taller fountain with more tiers or wider, it would overwhelm the space it is in. The large fountain would be cumbersome, hard to work around, and take all the visual appeal up for itself. With this fountain sized just right, your mind is available to view the entire scene, to sit back and relax and see who else is visiting the flora.